Vehicle Damage Detection
Accurately and efficiently identifying vehicle damage from video, still images.
eyepop.describe.vehicle-damage:latest & eyepop.find-events.detect-vehicle-damage:latest
Determine the primary content of the input and assign exactly one label from the following list: ['Damage', 'No_Damage'].
Choose 'Damage' only if the image primarily shows a vehicle exhibiting clear, actionable physical defects. This includes dents, crushed or crumpled body panels, shattered or cracked glass (windows, mirrors, lights), deep scratches that penetrate the paint, or broken and
...Run the full prompt in your EyePop.ai dashboard
Model type
EyePop.ai VLM
How It Works
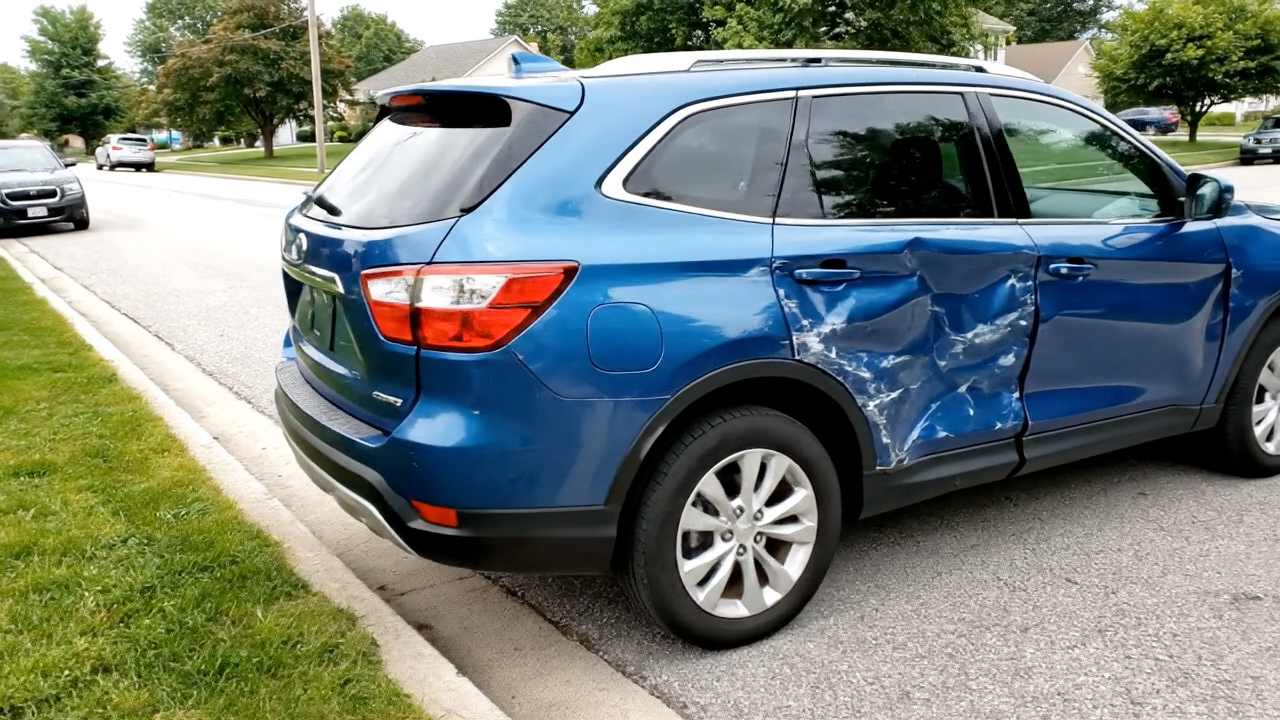
Insurance video footage, handheld and slightly shaky, slowly walking in an orbiting circle around a parked blue four-door SUV. As the camera pans over the car we note several damages: a shattered headlight and a crumpled side door. The video includes a full walk around the entire car, focusing on damaged parts but no closeups. Bright, overcast daylight, parked on a typical suburban street
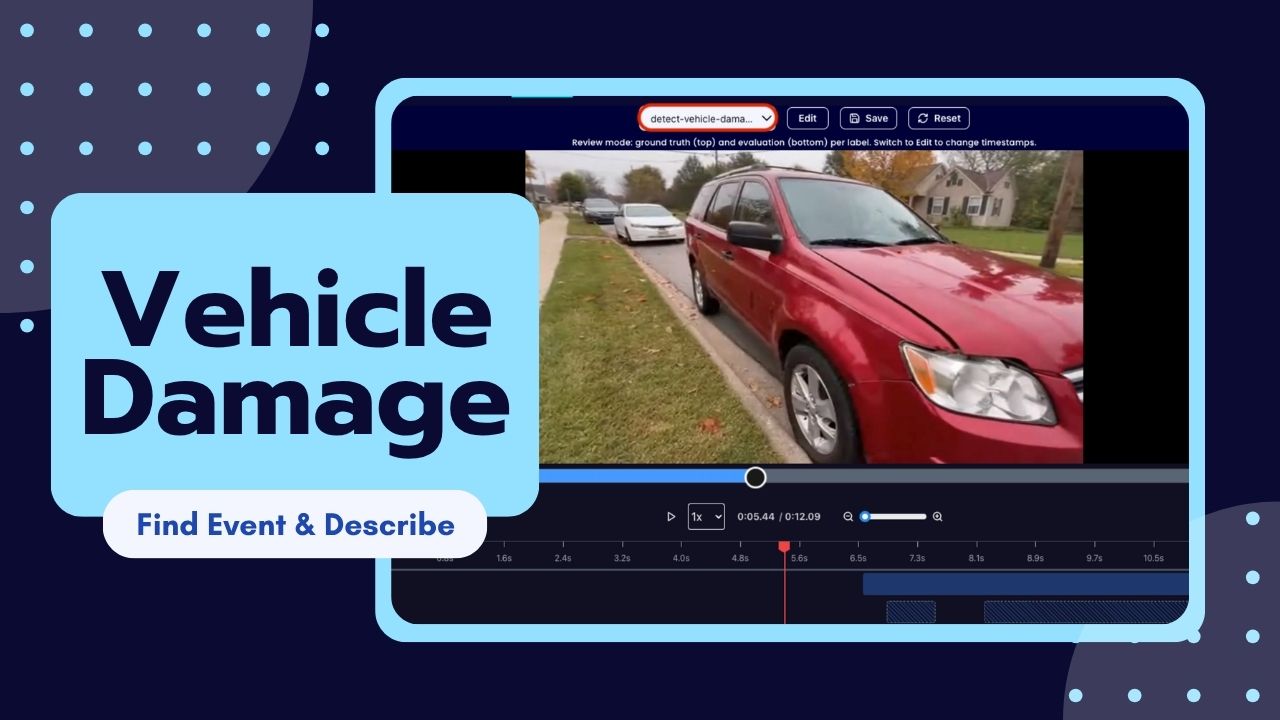
Processing vehicle insurance claims or doing a car inspection requires accurately and efficiently identifying vehicle damage. However, manually reviewing video footage of vehicles is time-consuming, prone to human error, and inefficient. Being able to automatically find damage and instantly generate repair assessments is vital for quickly processing claims and better for customers. To do this, we will utilize the Find Event task that scans the video footage to locate occurrences of vehicle damage, and then the Describe task that analyzes those specific segments to detail the exact nature of the damage and create a repair quote.
For example, a specific segment of a walk around video should be flagged by Find-Event with the label Damage if it shows a vehicle with issues such as scratches, shattered windows, and/or fallen off parts. Then the Describe task will process the segment to output a detailed text summary alongside an estimated quote for the fix.
We will need to separate occurrences of non-damaged car footage and visual artifacts like shadows with real vehicle damage.
Our expected inputs for the Find Event task are the videos of the vehicles and then expected outputs will be the timestamps of where the damage is visible. Then the Describe task will describe the damage on the car with quotes after feeding it the video.
UI Tutorial
Step 1: Create an Find Event Ability
Go to the Abilities tab and select the button Create Ability. Get early access to Abilities here >
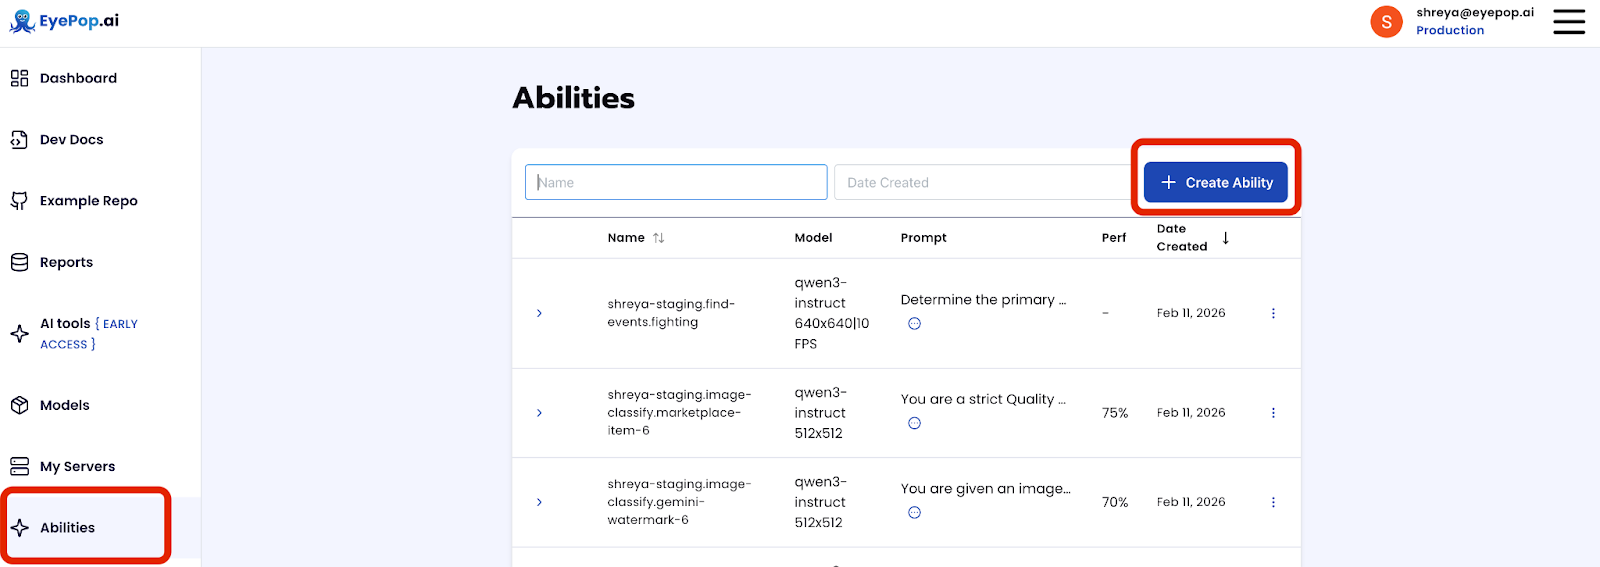
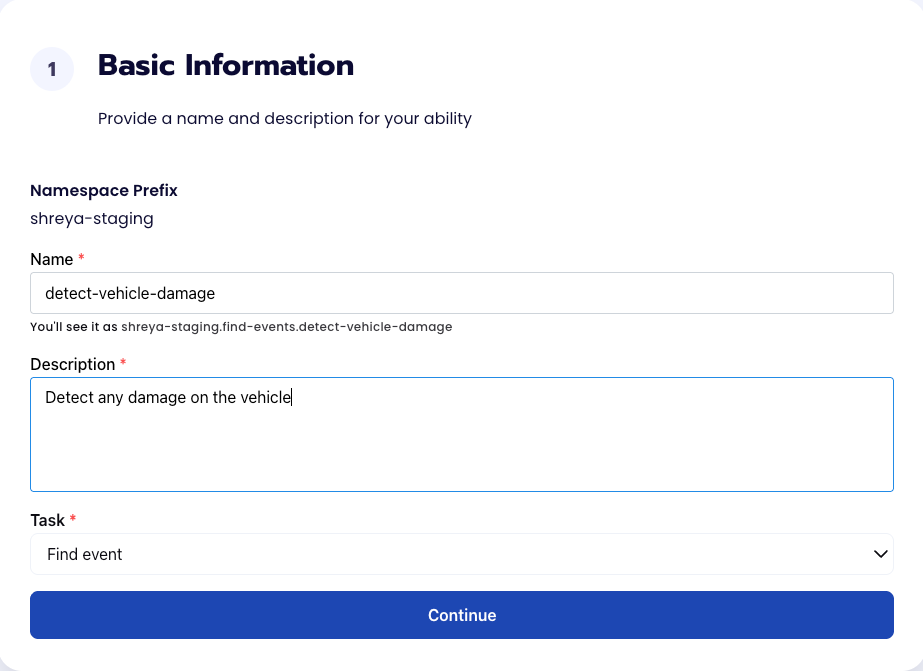
Fill out basic information about the ability such as its name and the description of the task itself. Since we are classifying an image, select the Task Type as Find Events.
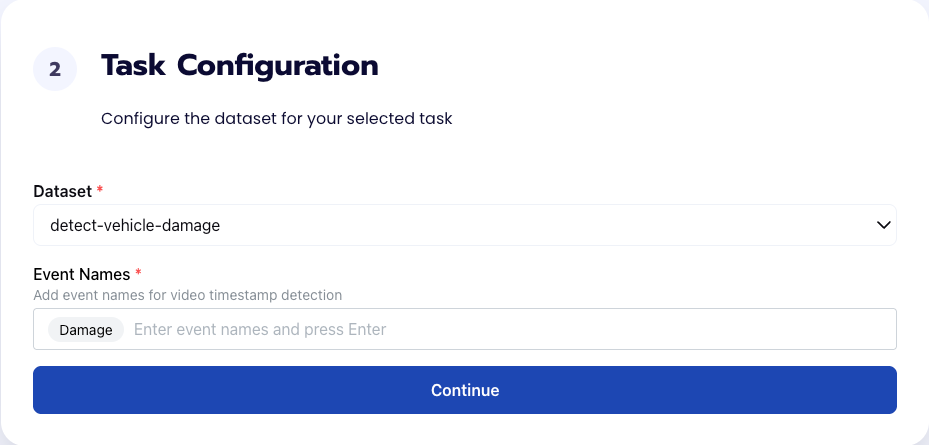
Step 2: Find Event Task Configuration
To configure the task, we need to select a dataset for the specific task. If you have already uploaded your videos in a dataset simply select the name of your dataset. However, if you haven’t already done so then select <New Dataset>, create a label Damage, upload your videos, and label them by identifying where the damaged parts of the vehicle appear in the video.
Step 3: Find Event Configuration
Our next step is to configure the prompt, select the model, and image size. For this use case, we recommend using the below prompt and settings for highest accuracy and best results.
Prompt:
Determine the primary content of the input and assign exactly one label from the following list: ['Damage', 'No_Damage'].
Choose 'Damage' only if the image primarily shows a vehicle exhibiting clear, actionable physical defects. This includes dents, crushed or crumpled body... Get early access to Abilities here >
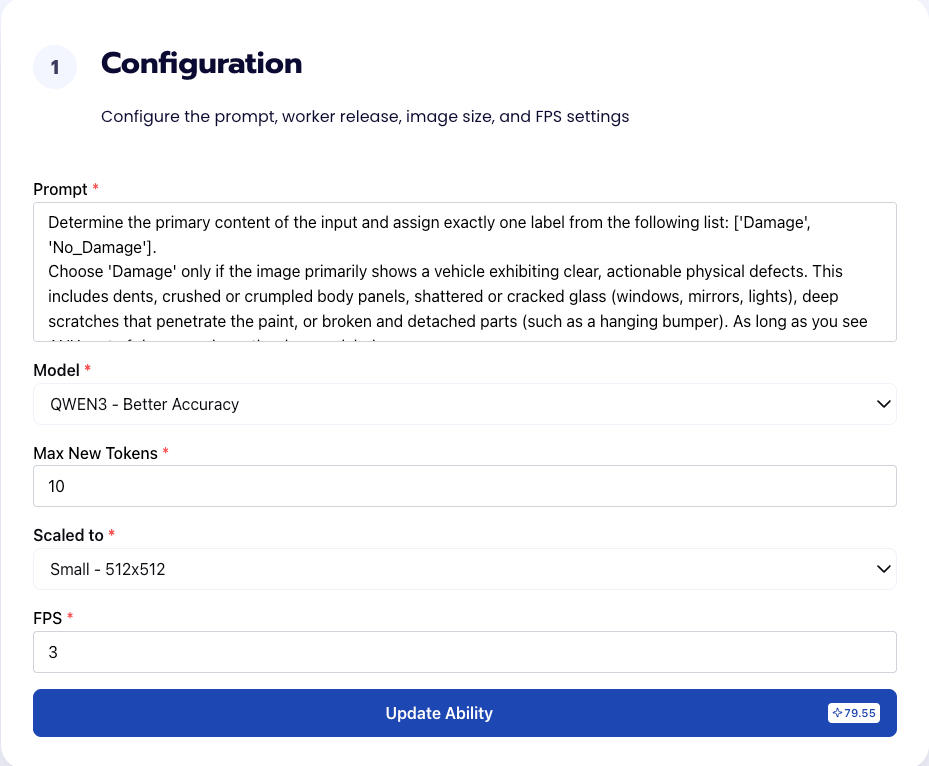
We chose Max New Tokens to be 10 since outputting the label Damage won’t take too many new tokens. In addition, we use an FPS of 3 to maximize efficiency; we are simply looking at damages on a parked car so we don’t need a high FPS rate since that would feed the model redundant images. An FPS of 3 will balance latency with visual detail to catch all damages.
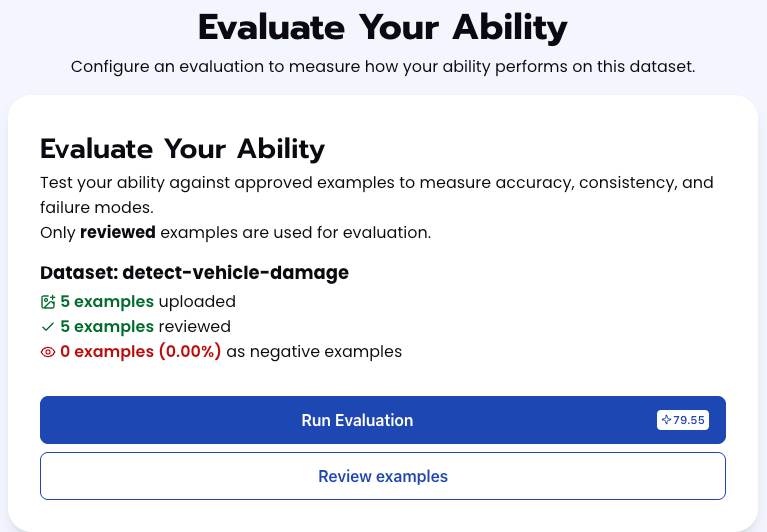
Step 4: Run Find Event Evaluation
To check how well the prompt does against the dataset, our next step is to run the evaluation. If needed, review the examples in your dataset to ensure all necessary images can be used in the evaluation.
Step 5: Check Find Event Evaluation
All evaluations can be reviewed in the Abilities tab by clicking the dropdown arrow next to the associated ability-alias. Evaluations can take around 15-20 minutes to complete based on the size of the dataset.
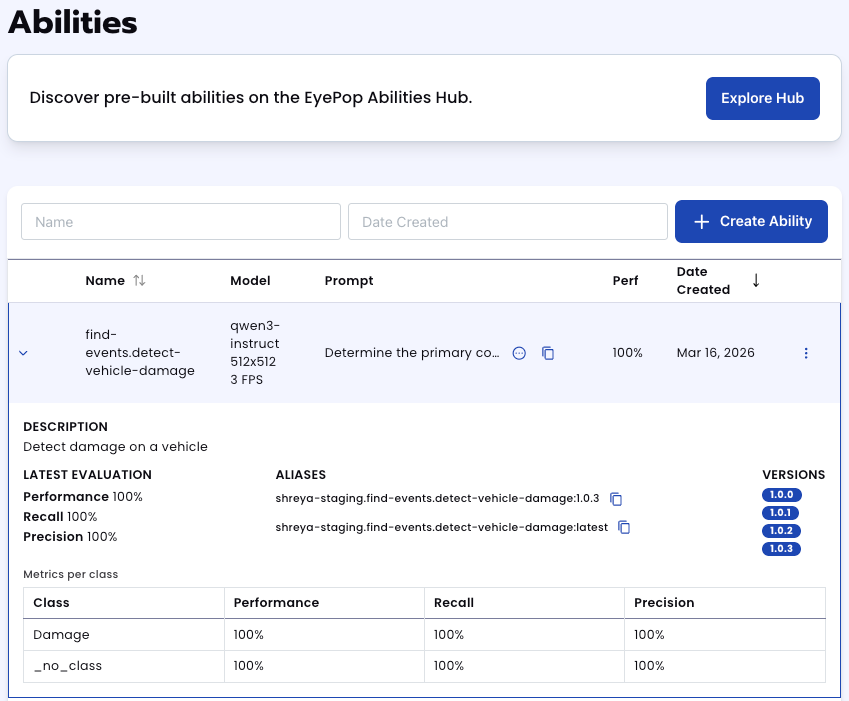
In addition to the performance, recall, and precision percentages you can find in evaluation a visualization of what the model predicted by revisiting the dataset. Click on the three dots and select “Go to reference dataset”.
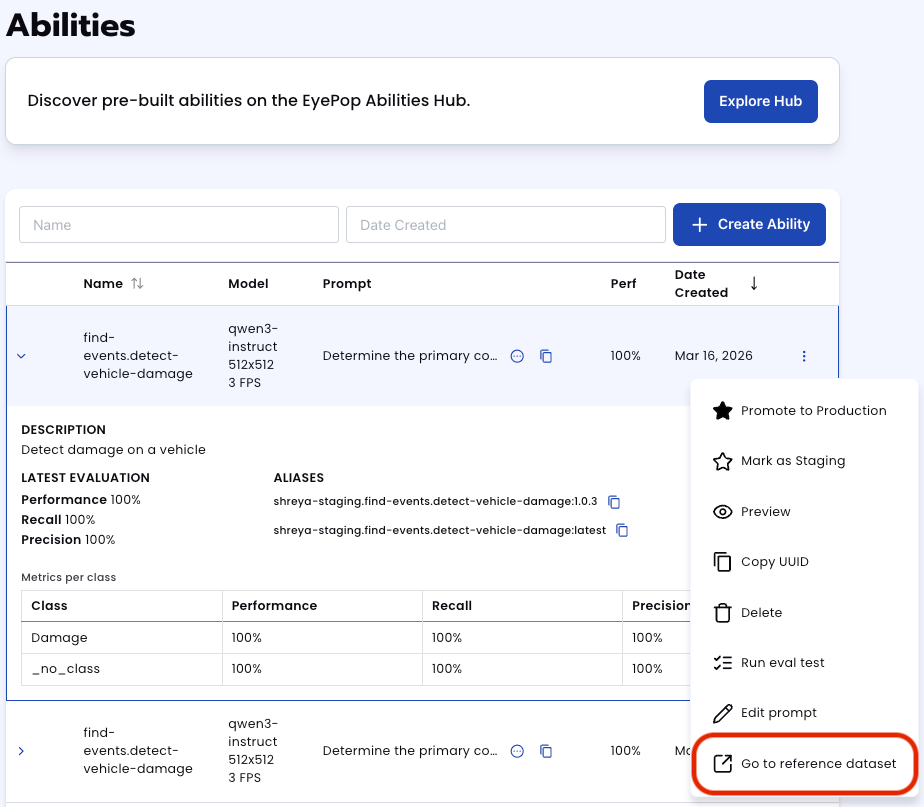
Select one of the videos in the dataset and click on the review button.
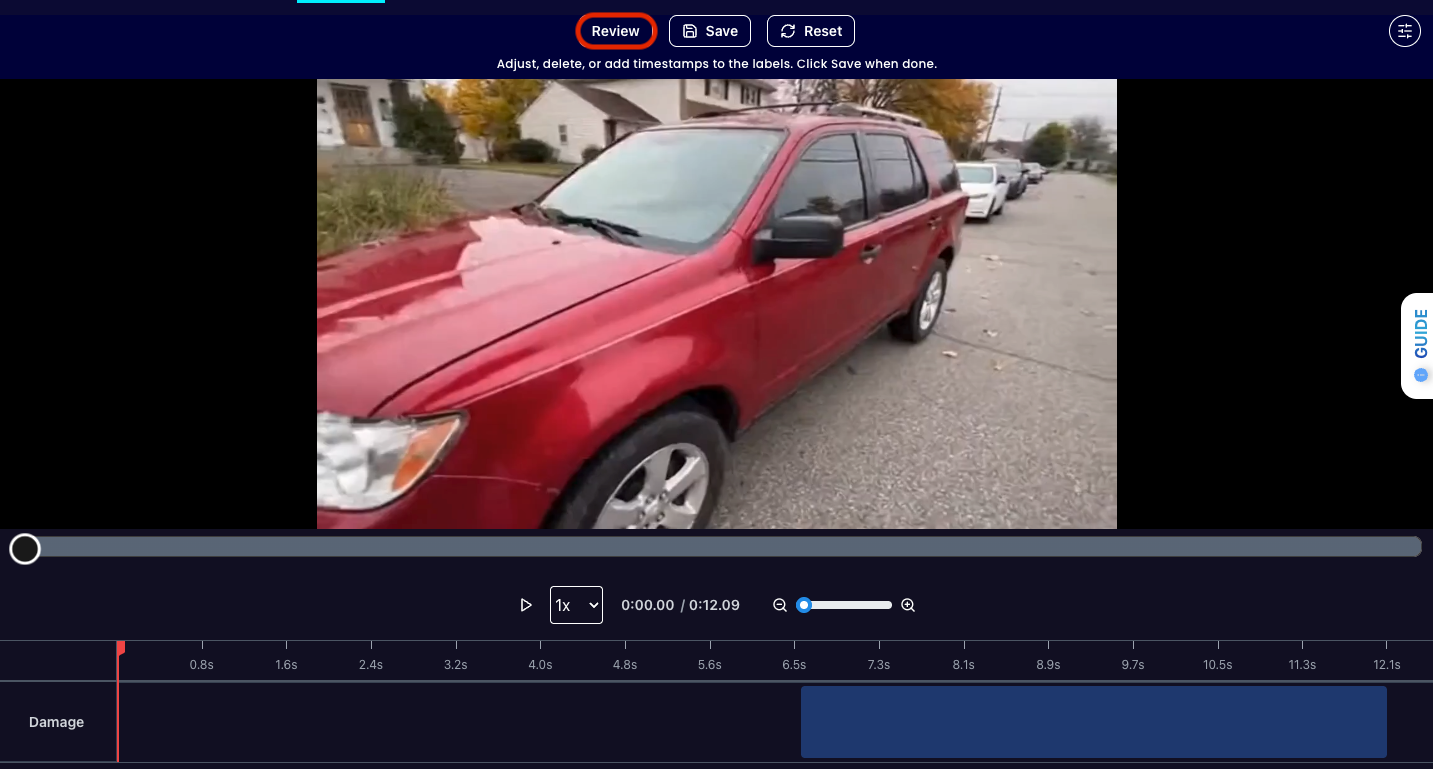
After running the evaluation you can see what the model labelled as Damage and compare it to what you labelled as Damage. With this, you can improve your prompts and thus improve your accuracy.
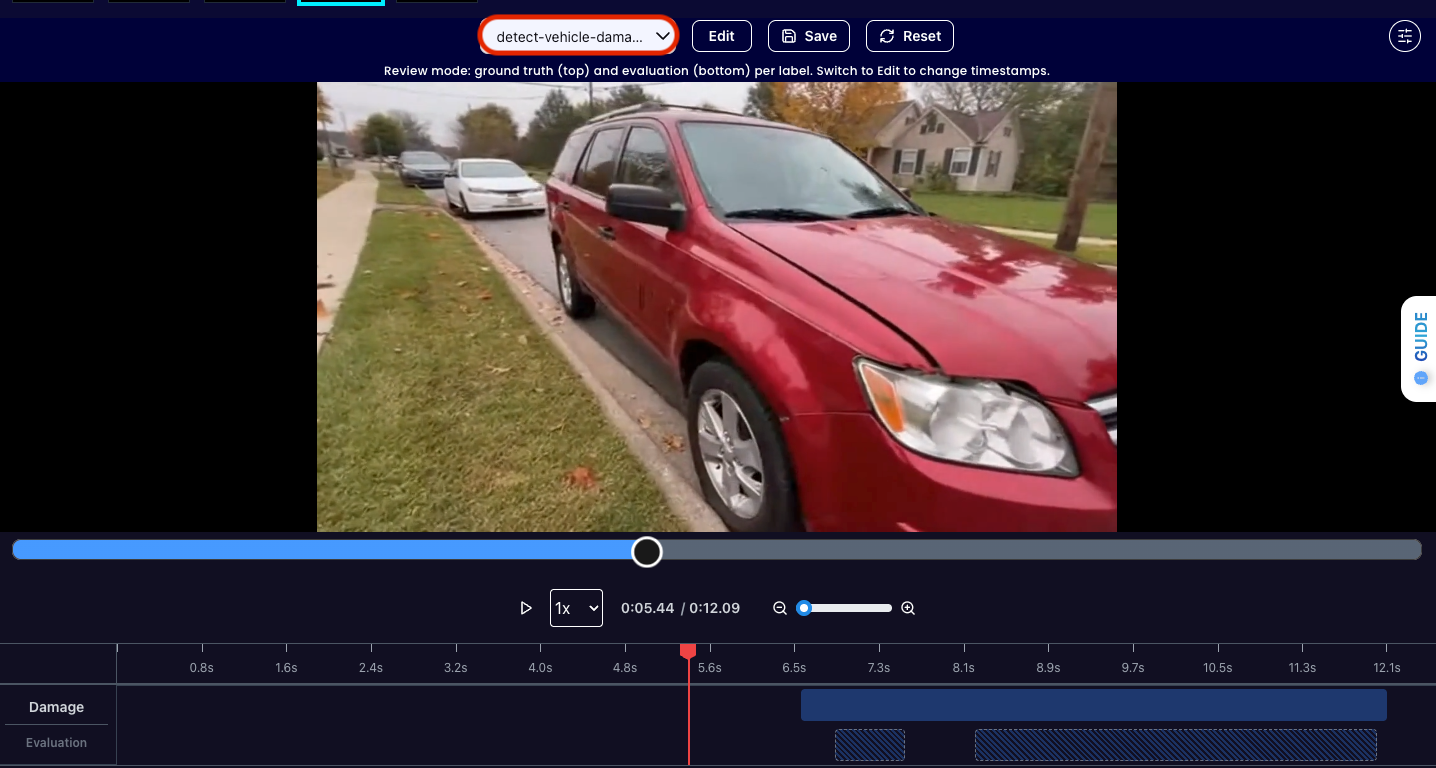
In addition, you can also review the differences between different iterations of your prompt by selecting the dropdown arrow. This helps refine your prompt even further. Get early access to Abilities here >
Step 6: Create Describe Ability
So far, we have created our find-event ability to identify where damage appears in a video however we still need to create a damage report. We can use the Describe ability with video in order to get a text description of the segment including damage and ask the model for an estimate on cost.
First, let’s define the ability:
ability_prototypes = [
   VlmAbilityCreate(
       name=f"{NAMESPACE_PREFIX}.describe.vehicle-damage",
       description="describe the vehicle damage and provide an estimated quote of how much it would cost to fix",
       worker_release="qwen3-instruct",
       text_prompt=damage_prompt,
       transform_into=TransformInto(),
       config=InferRuntimeConfig(
           max_new_tokens=250,
           image_size=512
       ),
       is_public=False
   )
]
Practical Use Cases
Below are applications where bounding-box-level person detection is sufficient and powerful.
Security & Access Control
- Intrusion detection
- Restricted zone monitoring
- After-hours occupancy alerts
- Perimeter breach detection
Retail & Physical Spaces
- Foot traffic counting
- Queue length estimation
- Heatmap generation (with tracking layer)
- Store occupancy analytics
Workplace Safety
- Restricted equipment proximity alerts
- Construction site monitorin
- Warehouse compliance auditing
Live Production & Media
- Auto-cropping livestreams
- Camera framing automation
- Dynamic speaker focus
- Sports sideline tracking
Smart Buildings
- Room occupancy detection
- HVAC optimization inputs
- Emergency evacuation monitoring
Robotics & Automation
- Human-aware robot navigation
- Safety buffer detection
- Human-robot interaction gating
Healthcare & Senior Care
- Fall detection systems (with additional logic)
- Room presence monitoring
- Assisted living oversight
Transportation & Smart Cities
- Platform crowd monitoring
- Transit occupancy analysis
- Crosswalk monitoring
Why Bounding Boxes Matter
A bounding box is not just a rectangle. It gives you:
- Position
- Scale
- Motion vector (when tracked over time)
- Relative distance proxy (via pixel size)
- Region-of-interest cropping
If you know where a person is in pixel space, you can derive everything else with additional logic.
Deployment Options
EyePop Cloud
- Scalable
- Managed infrastructure
- Ideal for web apps and SaaS
On-Premise Runtime
- Data never leaves your network
- Ideal for regulated industries
- Compatible with GPU or CPU servers
- Edge inference capable
Who This Is For
- Developers who need instant person detection
- Teams building safety or compliance tools
- Startups prototyping vision features
- Enterprises integrating vision into existing systems
If your system depends on knowing where people are, this model is the fastest way to get there.
Get early access
Want to move faster with visual automation? Request early access to Abilities and get notified as new vision capabilities roll out.