Detect an AI Watermark
Automatically classify if an image is generated from a popular image generation service.
eyepop.image-classify.detect-nano-watermark:latest
Prompt
You are given images generated from Nano Banana image generator. Your task is to detect the presence of an AI watermark. Look for a four pointed star or starburst shape, located in the bottom right corner. Assign the label Watermark if any of the following indicators are present, even if they are faint, partially obscured, or blended with the background: 1. There is a white, four-pointed...
...Run the full prompt in your EyePop.ai dashboard
Input
Image
Output
Watermark or No_Watermark
Image size
1000x1000 - Large
Model type
EyePop.ai VLM
How It Works
AI watermarking from services like Chat-GPT and Gemini has become important over the past year to show ownership and authenticity of digital images. Thus, being able to automatically classify if an image is generated from a popular image generation service is vital. The Classify Image task on the Abilities page can check if an image is AI generated or not based on the typical watermarking that happens on Gemini’s image generation service.
For example, the image below should be classified as containing a watermark because it contains the typical Gemini “sparkle” signifying that the image is generated.
In contrast, the image below should not be classified as containing a watermark. The image does contain an artist’s signature but since it’s not an AI related watermark we should output saying no watermark.

Our expected inputs are images and the expected output will be either Watermark or No_Watermark.
UI Tutorial
Step 1: Create an Ability
Go to the Abilities tab and select the button Create Ability.
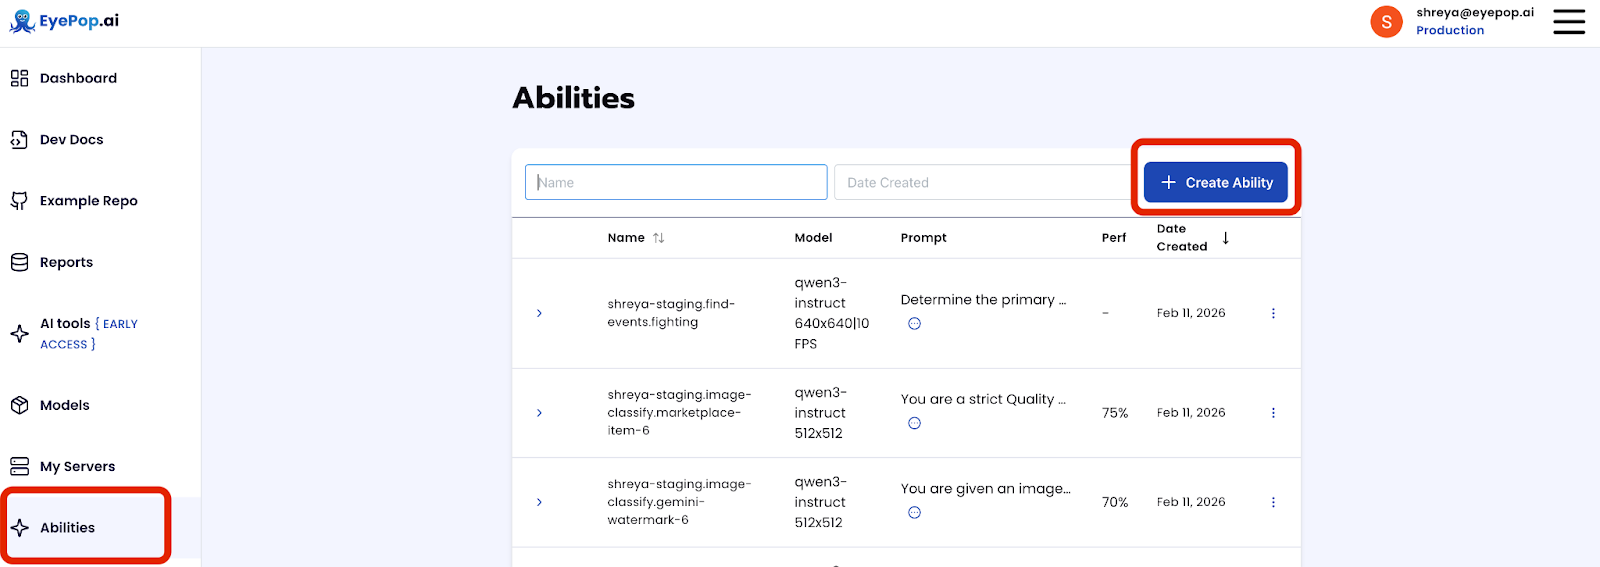
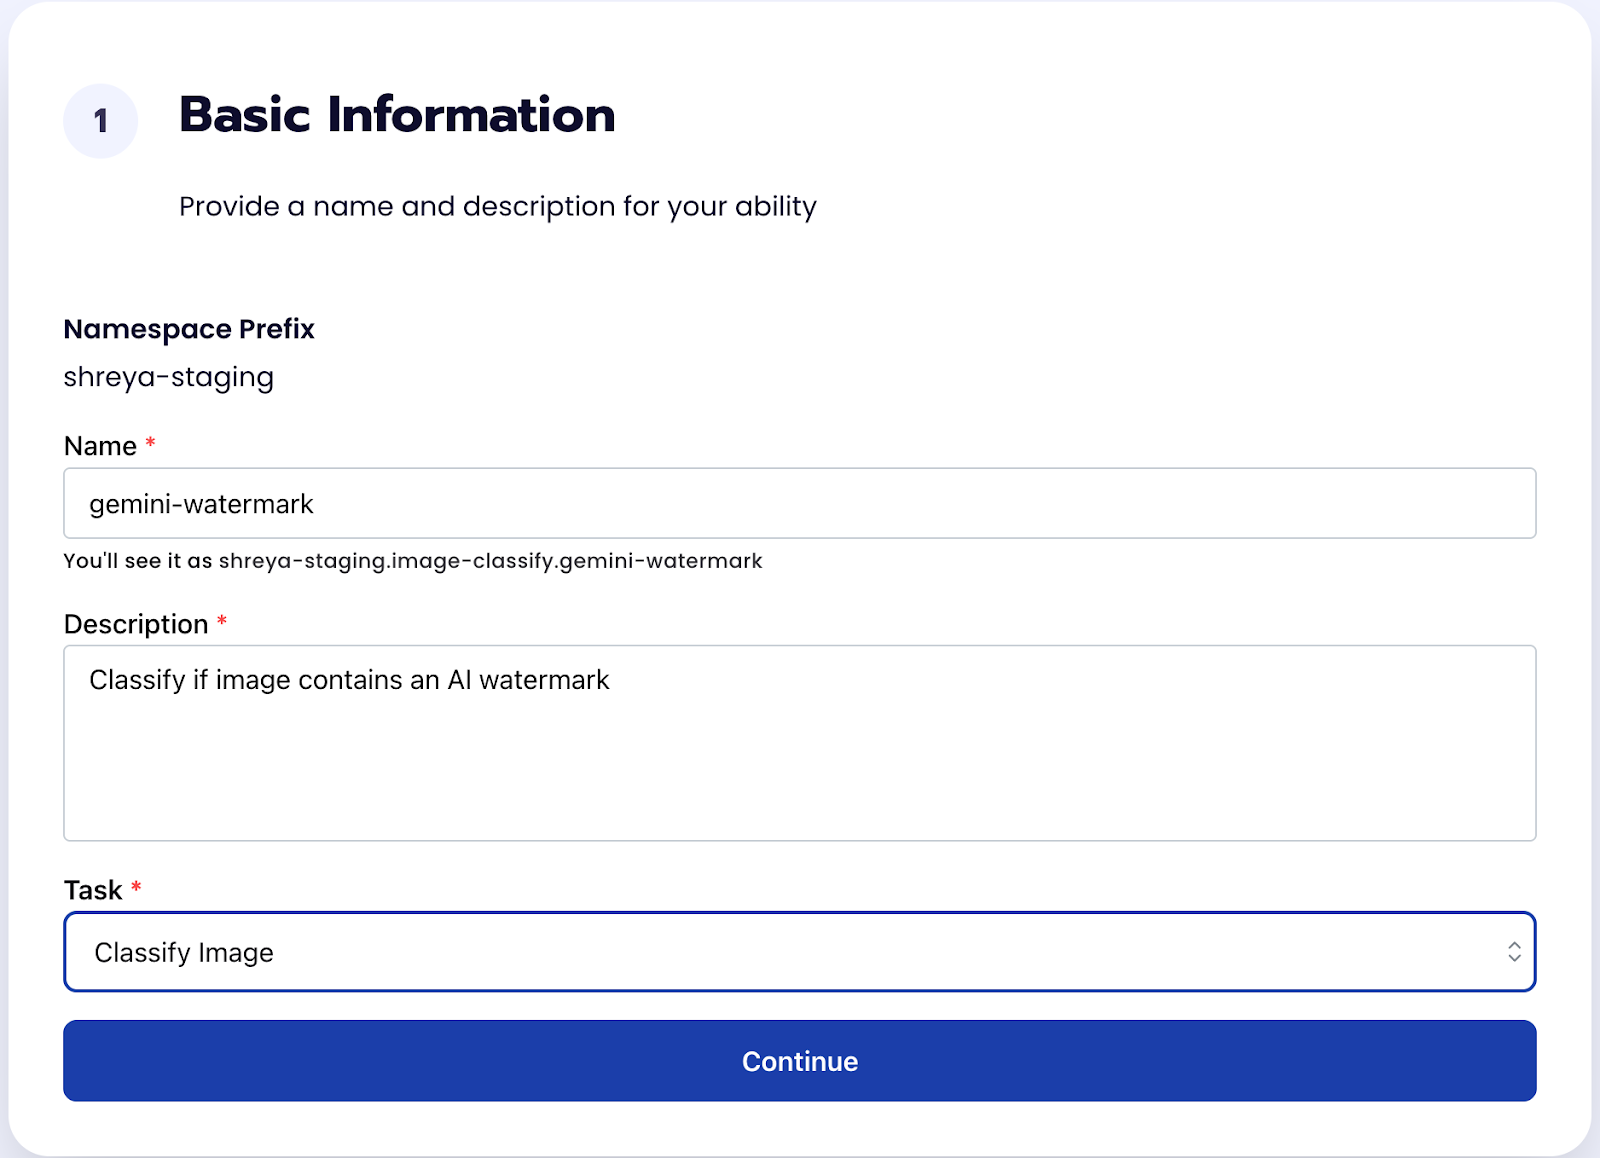
Fill out basic information about the ability such as its name and the description of the task itself. Since we are classifying an image, select the Task Type as Classify Image. Get early access to Abilities here >
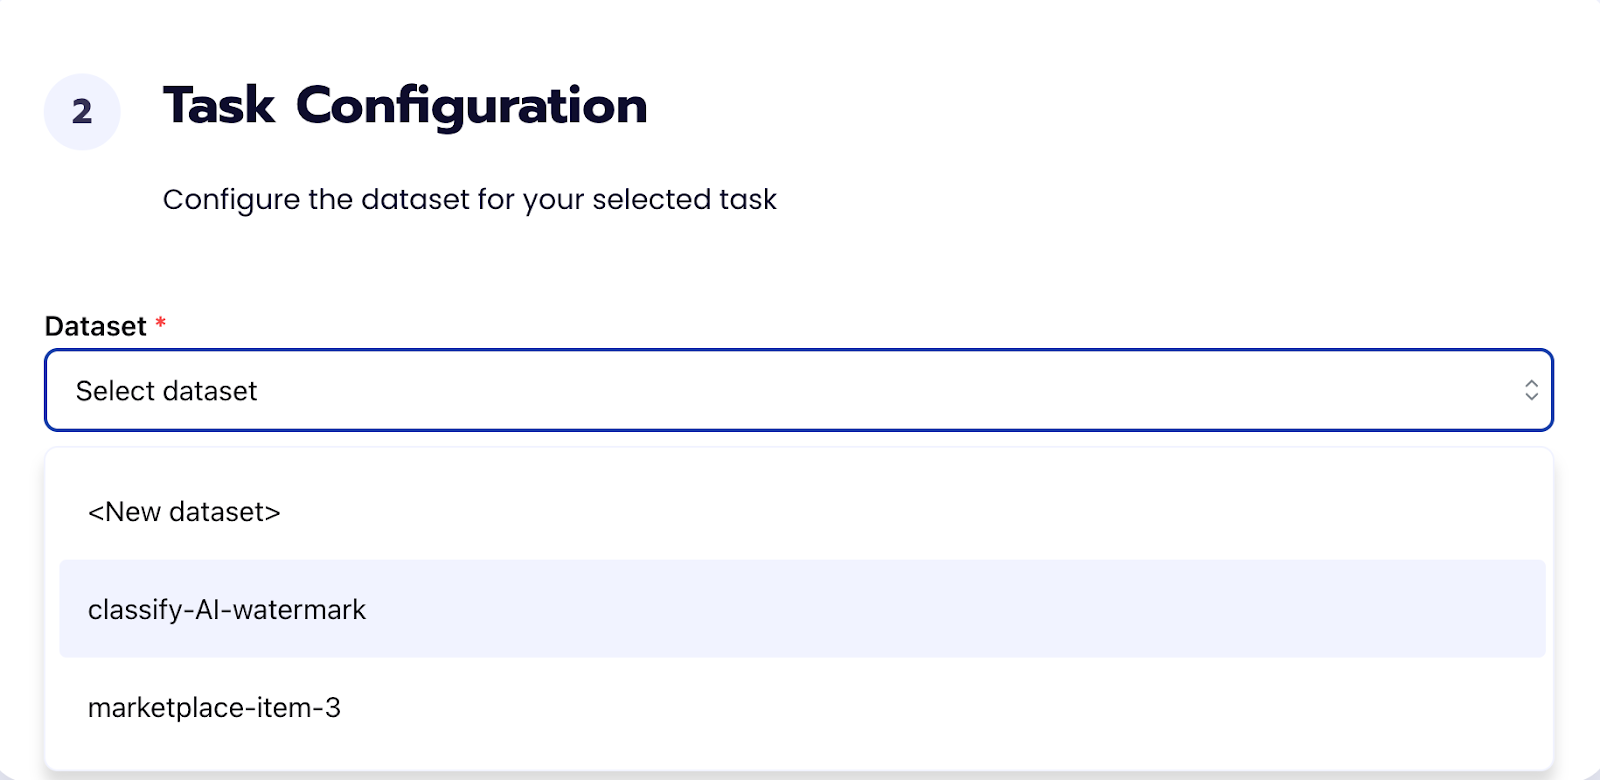
Step 2: Task Configuration
To configure the task, we need to select a dataset for the specific task. If you have already uploaded your images in a dataset simply select the name of your dataset. However, if you haven’t already done so then select <New Dataset> and upload your images, label them, and create two labels Watermark and No_Watermark.
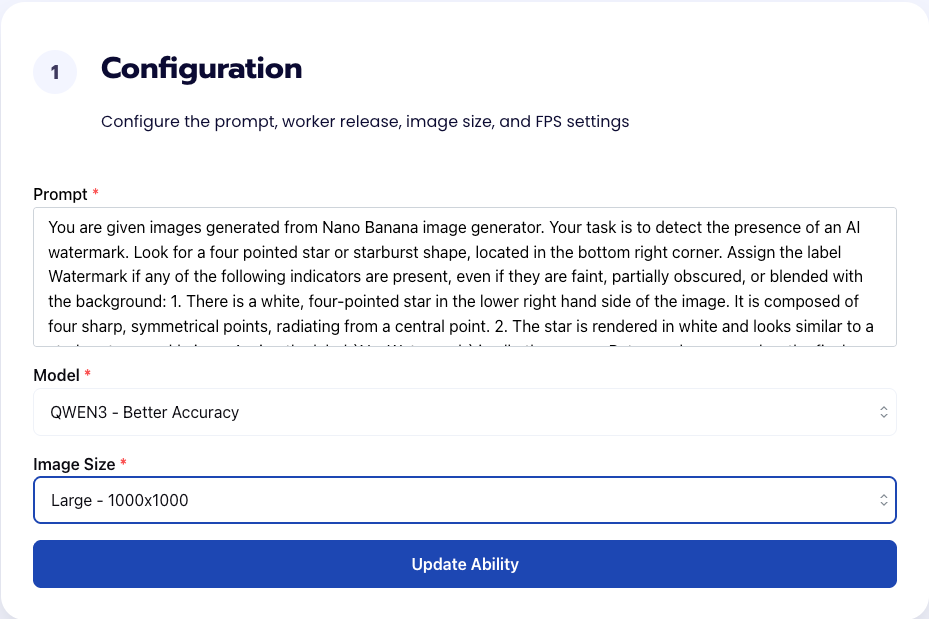
Step 3: Configuration
Our next step is to configure the prompt, select the model, and image size. For this use case, we recommend using the below prompt and settings for highest accuracy and best results. Get early access to Abilities here >
Prompt:
You are given images generated from Nano Banana image generator. Your task is to detect the presence of an AI watermark. Look for a four pointed star or starburst shape, located in the bottom right corner. Assign the label Watermark if any of the following indicators are present, even if they are faint, partially obscured, or blended with the background: 1. There is a white, four-pointed star in the lower right hand side of the image. It is composed of four sharp, symmetrical points, radiating from a central point. 2. The star is rendered in white and looks similar to a starburst or sparkle icon. Assign the label `No_Watermark` in all other cases. Return only one word as the final answer: either `Watermark` or `No_Watermark`.
Step 4: Run Evaluation
To check how well the prompt does against the dataset, our next step is to run the evaluation. If needed, review the examples in your dataset to ensure all necessary images can be used in the evaluation.

Step 5: Check Evaluation
All evaluations can be reviewed in the Abilities tab by clicking the dropdown arrow next to the associated ability-alias. Evaluations can take around 15-20 minutes to complete based on the size of the dataset.
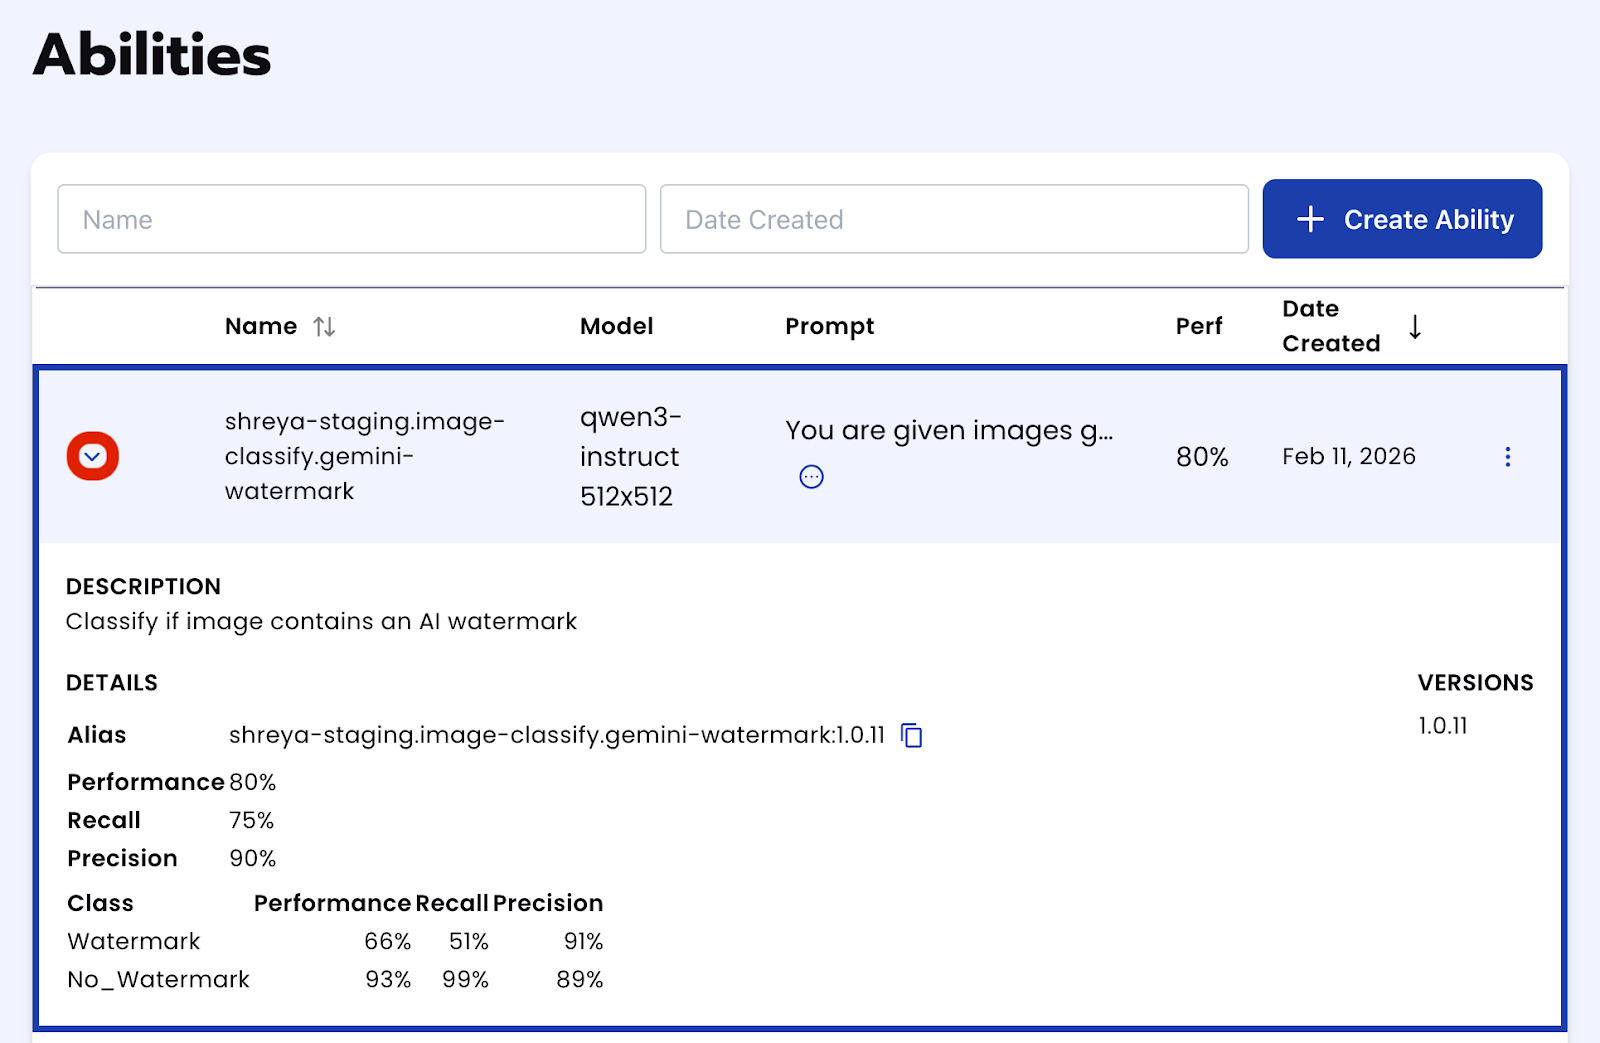
To edit the prompt and/or re-run the evaluation select the three-dots on the associated evaluation to make those changes. Get early access to Abilities here >
Tips for Accuracy
- Refine your dataset
Make sure that your dataset is robust and includes different examples of your use-case. For example, this dataset specifically looks for the Gemini watermark however if you are looking for ANY watermark make sure your dataset includes those images. - Improve your prompt
Ensuring that your prompt only asks to return one label at the end of your prompt is key to the model not returning a label that doesn’t belong. In addition, be as specific as possible about what you are looking for. A simple way to do this is by structuring the prompt as things to look for and the else condition being the `No` condition.
Shorter is often better so be concise while being as specific as possible.
Bonus
To improve prompting, try running the ability `Describe Image`!
Having the model describe what you are trying to classify in the image can help improve the prompt. To do this, select the Create Ability button and follow the same steps as above but instead of setting the Task Type to be Classify Image, change it to Describe Image. From there, upload an image containing the feature you are classifying and explain the task in the prompt.
For example, to get a better description of the Gemini watermark in the AI generated image we asked: “You are given an image generated from Nano Banana image generator. Your task is to describe the symbol at the lower right hand side of the figure. State any defining features.”
Get early access
Want to move faster with visual automation? Request early access to Abilities and get notified as new vision capabilities roll out.